Difference between revisions of "Lights: Clean and Restore Glass Headlights"
Stealthify (talk | contribs) |
Stealthify (talk | contribs) (Rebuilt tutorial using new photos and improved grammar/structure/instructions) |
||
| Line 1: | Line 1: | ||
[[Category:How To]] | [[Category:How To]] | ||
[[Category:Lights]] | [[Category:Lights]] | ||
| − | [[ | + | __NOTOC__ |
| − | + | [[Image:Headlight_Restoration-1999_3000GT-After-1.jpg|thumb|right|400px|A Cleaned/Restored 1999 Mitsubishi 3000GT Headlight]] | |
| + | One of the most common exterior issues that owners of 1994-1996 [[Mitsubishi_3000GT/Dodge_Stealth|Dodge Stealth]] and 1994-1999 [[Mitsubishi_3000GT/Dodge_Stealth|Mitsubishi 3000GT/GTO]] face is the hazing, fogging, yellowing and/or oxidation of their clear headlight covers. What was once a perfectly clear, smooth lens when our cars were new has eventually given way to a crusty, flakey or clouded appearance that may seem nearly impossible to remove. Impossibility is not an option, and what now looks old can become new again! Depending on the material of your headlight cover, there are two differing methods owners can take to remedy this problem with the most basic of materials. | ||
| + | |||
| + | ==== Determining Glass or Lexan/Plastic ==== | ||
| + | Before proceeding, you will need to determine if your headlight covers are made of glass or lexan/plastic. Most 1994 Mitsubishi 3000GT/GTO and Dodge Stealth owners can assume their covers are glass, while most 1995 and above owners will find their headlight covers are lexan/plastic. There may be some crossover between 1994-1995 as leftover headlights from 1994 may have been used on 1995 year vehicles. | ||
| + | |||
| + | <br style="clear:both" /> | ||
| + | == Restore Lexan/Plastic Headlights on a 1995+ Mitsubishi 3000GT/GTO and Dodge Stealth == | ||
| + | [[Image:Headlight_Restoration-1999_3000GT-Before-2.jpg|thumb|right|300px|Lexan/Plastic 1999 Mitsubishi 3000GT Headlight (pre-restoration)]] | ||
| + | Lexan/plastic headlights that are in need of a good cleaning/restoration are pretty easy to spot. Chances are they'll look close to the image to the right, with a flaked, scratched or white-encrusted surface. All lexan/plastic headlights are prone to this ultimate fate, and can be the result of years of putting up with nature's wrath, including harsh sunlight and being exposed to the elements. Over time, the clear, protective coating on these headlights seperate from the plastic, resulting in the tattered appearance that they have now. In order to fix this, you must reverse the damage by removing the old clear coat, and then re-apply a new protective coat in its place. | ||
| + | |||
| + | While not all of the following materials are required, all together they should cost about $25 - $30 and can be found at most AutoZones, O'Reillys or even Wal Mart if you're down with that. Alternatively, some retailers (e.g. [http://www.micro-surface.com/ Micro-Surface.com]) also sell kits that promise the same results, and may be slightly less expensive. | ||
| + | |||
| + | |||
| + | ==== Materials Required ==== | ||
| + | [[Image:Headlight_Restoration_Materials.jpg|thumb|right|250px|Headlight Restoration Material Kit]] | ||
| + | * Bowl of water | ||
| + | * 3M Sandpaper (3-styles) | ||
| + | ** 1000 Grit | ||
| + | ** 1500 Grit | ||
| + | ** 2000 Grit | ||
| + | * 3M Imperial Hand Glaze (#05990) | ||
| + | * 3M Professional Swirl Mark Remover <span style="color:gray;">(optional)</span> | ||
| + | * Maguire's Polish | ||
| + | * Mothers California Gold Pure Carnauba Wax | ||
| + | |||
| + | |||
| + | ==== Tools Required ==== | ||
| + | * Phillips screwdriver | ||
| + | * Socket wrench w/ socket | ||
| + | * Terry cloth(s) / Microfiber cloth(s) | ||
| + | * Orbital buffer <span style="color:gray;">(optional)</span> | ||
| + | * 3M Hand Sanding Block <span style="color:gray;">(optional)</span> | ||
| + | |||
| + | |||
| + | === Remove Headlights === | ||
| + | # '''Unbolt the top three bolts holding the headlights to the car'''. Upon opening the hood, you will see and need to unscrew the three visible bolts holding each headlight in place. | ||
| + | #: [[Image:Headlight_Removal-Top_Bolts.jpg|thumb|none|250px|Unbolt the top 3 headlight bolts]] | ||
| + | # '''Remove turn signals/side markers'''. Each headlight has one hidden bolt behind the turn signal. Unscrew the single screw holding the turn signals in place, and remove the turn signal by sliding it towards the front of the car. Be aware/cautious of the two prongs on the back of the turn signal to keep them from scratching your paint. You do not need to disconnect the signal's wiring harness. | ||
| + | # '''Unbolt the one remaining headlight bolt'''. The bolt can be found behind where the turn signal used to be. | ||
| + | #: [[Image:Headlight_Removal-Turn_Signal_Bolt.jpg|thumb|none|250px|Unbolt the 1 side headlight bolt]] | ||
| + | # '''Detach the headlights from their wire harnesses and remove them from the car'''. | ||
| + | |||
| + | |||
| + | === Wet Sand the Headlights === | ||
| + | The sanding portion is arguably the most strenuous part of restoring your headlights. It takes a lot of rubbing, and your arm should feel like it's about to fall off by the time you're done. Take extra care during this step, as this is what'll ultimately remove the existing flaking/grime that sits on top of your headlight covers. | ||
| + | # '''Prepare a bowl of clean water'''. | ||
| + | # '''Attach the 1000 grit sandpaper to the hand sanding block'''. While the hand sanding block is optional, it does make the process a lot easier. | ||
| + | # '''Dip the sanding paper into the bowl of water and begin sanding the headlight'''. The surface of the headlights will turn white while sanding, and may even start looking worse (don't worry, this is expected). Keep sanding until the color is consistant. Any discolored areas means there is still clear coat left. Be sure to continuously dip the sandpaper back into the water to keep it wet. The more blemishes you remove with the 1000 grit sandpaper, the easier the following steps will be. | ||
| + | # '''Repeat the process with 1500 grit sandpaper'''. Sand everything in one direction, and be sure to give special attention to any scratched areas on your headlights to smooth them out. Once the color of the surface of your headlights is consistant once again, proceed to the next step. | ||
| + | # '''Repeat the process with 2000 grit sandpaper'''. Continue dipping the sandpaper in water and then sanding the surface of the headlight. Once the surface color is consistant and you feel you have sanded out the imperfections, it's time to start making them shiny again. | ||
| + | |||
| + | <gallery widths=150> | ||
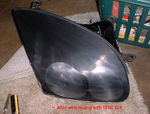
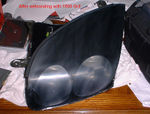
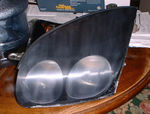
| + | Image:Headlight_Restoration-Wet_Sand_1000_Grit-After.jpg|After 1000 Grit | ||
| + | Image:Headlight_Restoration-Wet_Sand_1500_Grit-After.jpg|After 1500 Grit | ||
| + | Image:Headlight_Restoration-Wet_Sand_2000_Grit-After.jpg|After 2000 Grit | ||
| + | </gallery> | ||
| + | |||
| + | |||
| + | === Apply Hand Glaze and Swirl Remover === | ||
| + | # '''Apply the 3M Imperial Hand Glaze to a clean terry cloth'''. | ||
| + | # '''Rub the glaze onto the headlight in a circular motion'''. Rub for about a minute or two, and then use another clean cloth to wipe off the residue. It may take a few additional applications of the hand glaze to remove all of the haze. Continue this step until your headlight looks like this: | ||
| + | # '''Apply the 3M Swirl Remover to the orbital buffer (optional)'''. The necessity of this step is debatable, but may help remove any final imperfections that the wet sanding didn't take care of. | ||
| + | # '''Buff the surface of the headlight using the swirl remover (optional)'''. Run the orbital buffer over the complete surface of the headlight. You will notice the lens will start becoming hazy again. | ||
| + | # '''Re-apply the 3M Imperial Hand Glaze'''. Just like you did after the wet sanding, use the hand glaze to remove the haze from the surface of the headlight until all of the haze is gone. | ||
| + | |||
| + | <gallery widths=150> | ||
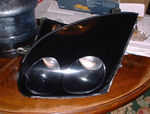
| + | Image:Headlight_Restoration-Hand_Glaze-After.jpg|After Hand Glaze | ||
| + | </gallery> | ||
| + | |||
| + | |||
| + | === Apply Polish and Carnauba Wax === | ||
| + | # '''Apply the Meguire's Polish to a clean terry cloth'''. | ||
| + | # '''Rub the polish onto the headlight in a circular motion'''. You will begin to see real shine start to come back to your headlights. After applying one coat of polish, you may wish to apply another coat of Hand Glaze (which is optional, but may further help clean them up). | ||
| + | # '''Apply the Mothers California Gold Pure Carnauba Wax to the headlight'''. The wax is used to help protect the headlight lens from future damage. Apply several layers, and remove any excess with a clean microfiber cloth. | ||
| + | |||
| + | |||
| + | Enjoy your brand new looking headlights! | ||
| + | |||
| + | == Restore Glass Headlights on a 1994 Mitsubishi 3000GT/GTO and Dodge Stealth == | ||
Cleaning the 94 (glass) headlights is a somewhat simple task, but time consuming. First, pre-heat your oven to 250 Degrees. Now remove the light bulbs from the back of the lights, remove the lights from the car. Clean all the crap off of the outside with a wet towel or something. Remove the stainless stell clips that hold the 2 peices of the light together by either using a screwdriver or needlenose pliers, I used the needlenose pliers b/c it was a bit easier. Place the light(s) in the oven for 5-10 minutes to soften the sealing compound that bonds the glass to the plastic, you have to kinda do this next part in a hurry, you might get your hands burned a bit, I used 2 oven mits, 2 small flat head screwdrivers, and a decent pocket knife, when you take the light out of the oven, obviously it's gonna be somewhat hot, but you have to get a screwdriver or knife inbetween the two and seperate them, I also had a razor blade to cut the bonding compound while I was separating it so I didnt have to really cleanup the glass from the bonding compound snapping back and sticking to the glass, be careful while separating so you dont chip the glass, remember these headlights are $900 each from the dealer (I think), when you separate the glass from the plastic, you will be able to clean both sides, the plastic part and the glass part, for the plastic, it shouldnt be that bad, so I would just clean with windex or something, for the glass, you might have to use steel wool, that's right, steel woll, it didnt scratch it for me or 2 other people around me, so you can test it for yourself, it worked great, and was a million times easier this way, I did however spray invisible glass which is a glass cleaner, and let it soak for about 5 mins before the liquid glass. After cleaning you can now re-assemble, you can just put them back together, and put them in the oven at the same temp for the same time, make sure you have the sealant off of the visible part of the glass (it's still gonna be on the mating surfaces) when you do this, after 5-10 mins in the oven again, take it back out and now push it together enough so that you can get the stainless steel clips back on, then I dont think you have to do this, but I put mine back in for another 5-10 mins just for good measure to make sure they were sealed enough, then put em back in the car, dont spray anything on them when they come out of the oven while they are hot, glass can crack when the temp drastically changes, just a heads up, i'm sure someone can elaborate more on this subject, but if anyone has any questions, you can pm me on 3SI or aim | Cleaning the 94 (glass) headlights is a somewhat simple task, but time consuming. First, pre-heat your oven to 250 Degrees. Now remove the light bulbs from the back of the lights, remove the lights from the car. Clean all the crap off of the outside with a wet towel or something. Remove the stainless stell clips that hold the 2 peices of the light together by either using a screwdriver or needlenose pliers, I used the needlenose pliers b/c it was a bit easier. Place the light(s) in the oven for 5-10 minutes to soften the sealing compound that bonds the glass to the plastic, you have to kinda do this next part in a hurry, you might get your hands burned a bit, I used 2 oven mits, 2 small flat head screwdrivers, and a decent pocket knife, when you take the light out of the oven, obviously it's gonna be somewhat hot, but you have to get a screwdriver or knife inbetween the two and seperate them, I also had a razor blade to cut the bonding compound while I was separating it so I didnt have to really cleanup the glass from the bonding compound snapping back and sticking to the glass, be careful while separating so you dont chip the glass, remember these headlights are $900 each from the dealer (I think), when you separate the glass from the plastic, you will be able to clean both sides, the plastic part and the glass part, for the plastic, it shouldnt be that bad, so I would just clean with windex or something, for the glass, you might have to use steel wool, that's right, steel woll, it didnt scratch it for me or 2 other people around me, so you can test it for yourself, it worked great, and was a million times easier this way, I did however spray invisible glass which is a glass cleaner, and let it soak for about 5 mins before the liquid glass. After cleaning you can now re-assemble, you can just put them back together, and put them in the oven at the same temp for the same time, make sure you have the sealant off of the visible part of the glass (it's still gonna be on the mating surfaces) when you do this, after 5-10 mins in the oven again, take it back out and now push it together enough so that you can get the stainless steel clips back on, then I dont think you have to do this, but I put mine back in for another 5-10 mins just for good measure to make sure they were sealed enough, then put em back in the car, dont spray anything on them when they come out of the oven while they are hot, glass can crack when the temp drastically changes, just a heads up, i'm sure someone can elaborate more on this subject, but if anyone has any questions, you can pm me on 3SI or aim | ||
| Line 9: | Line 88: | ||
[[User:Mywetdream|Mywetdream]] 21:02, 14 May 2006 (EDT) | [[User:Mywetdream|Mywetdream]] 21:02, 14 May 2006 (EDT) | ||
| + | Written by Mel16m | ||
| + | |||
| + | |||
| + | == Gallery of Restored Headlights == | ||
| + | <gallery widths=300> | ||
| + | Image:Headlight_Restoration-1999_3000GT-After-2.jpg | ||
| + | Image:Headlight_Restoration-1995_3000GT-After.jpg | ||
| + | </gallery> | ||
Revision as of 08:44, June 19, 2013

One of the most common exterior issues that owners of 1994-1996 Dodge Stealth and 1994-1999 Mitsubishi 3000GT/GTO face is the hazing, fogging, yellowing and/or oxidation of their clear headlight covers. What was once a perfectly clear, smooth lens when our cars were new has eventually given way to a crusty, flakey or clouded appearance that may seem nearly impossible to remove. Impossibility is not an option, and what now looks old can become new again! Depending on the material of your headlight cover, there are two differing methods owners can take to remedy this problem with the most basic of materials.
Determining Glass or Lexan/Plastic[edit]
Before proceeding, you will need to determine if your headlight covers are made of glass or lexan/plastic. Most 1994 Mitsubishi 3000GT/GTO and Dodge Stealth owners can assume their covers are glass, while most 1995 and above owners will find their headlight covers are lexan/plastic. There may be some crossover between 1994-1995 as leftover headlights from 1994 may have been used on 1995 year vehicles.
Restore Lexan/Plastic Headlights on a 1995+ Mitsubishi 3000GT/GTO and Dodge Stealth[edit]

Lexan/plastic headlights that are in need of a good cleaning/restoration are pretty easy to spot. Chances are they'll look close to the image to the right, with a flaked, scratched or white-encrusted surface. All lexan/plastic headlights are prone to this ultimate fate, and can be the result of years of putting up with nature's wrath, including harsh sunlight and being exposed to the elements. Over time, the clear, protective coating on these headlights seperate from the plastic, resulting in the tattered appearance that they have now. In order to fix this, you must reverse the damage by removing the old clear coat, and then re-apply a new protective coat in its place.
While not all of the following materials are required, all together they should cost about $25 - $30 and can be found at most AutoZones, O'Reillys or even Wal Mart if you're down with that. Alternatively, some retailers (e.g. Micro-Surface.com) also sell kits that promise the same results, and may be slightly less expensive.
Materials Required[edit]

- Bowl of water
- 3M Sandpaper (3-styles)
- 1000 Grit
- 1500 Grit
- 2000 Grit
- 3M Imperial Hand Glaze (#05990)
- 3M Professional Swirl Mark Remover (optional)
- Maguire's Polish
- Mothers California Gold Pure Carnauba Wax
Tools Required[edit]
- Phillips screwdriver
- Socket wrench w/ socket
- Terry cloth(s) / Microfiber cloth(s)
- Orbital buffer (optional)
- 3M Hand Sanding Block (optional)
Remove Headlights[edit]
- Unbolt the top three bolts holding the headlights to the car. Upon opening the hood, you will see and need to unscrew the three visible bolts holding each headlight in place.
- Remove turn signals/side markers. Each headlight has one hidden bolt behind the turn signal. Unscrew the single screw holding the turn signals in place, and remove the turn signal by sliding it towards the front of the car. Be aware/cautious of the two prongs on the back of the turn signal to keep them from scratching your paint. You do not need to disconnect the signal's wiring harness.
- Unbolt the one remaining headlight bolt. The bolt can be found behind where the turn signal used to be.
- Detach the headlights from their wire harnesses and remove them from the car.


Wet Sand the Headlights[edit]
The sanding portion is arguably the most strenuous part of restoring your headlights. It takes a lot of rubbing, and your arm should feel like it's about to fall off by the time you're done. Take extra care during this step, as this is what'll ultimately remove the existing flaking/grime that sits on top of your headlight covers.
- Prepare a bowl of clean water.
- Attach the 1000 grit sandpaper to the hand sanding block. While the hand sanding block is optional, it does make the process a lot easier.
- Dip the sanding paper into the bowl of water and begin sanding the headlight. The surface of the headlights will turn white while sanding, and may even start looking worse (don't worry, this is expected). Keep sanding until the color is consistant. Any discolored areas means there is still clear coat left. Be sure to continuously dip the sandpaper back into the water to keep it wet. The more blemishes you remove with the 1000 grit sandpaper, the easier the following steps will be.
- Repeat the process with 1500 grit sandpaper. Sand everything in one direction, and be sure to give special attention to any scratched areas on your headlights to smooth them out. Once the color of the surface of your headlights is consistant once again, proceed to the next step.
- Repeat the process with 2000 grit sandpaper. Continue dipping the sandpaper in water and then sanding the surface of the headlight. Once the surface color is consistant and you feel you have sanded out the imperfections, it's time to start making them shiny again.
After 1000 Grit
After 1500 Grit
After 2000 Grit


Apply Hand Glaze and Swirl Remover[edit]
- Apply the 3M Imperial Hand Glaze to a clean terry cloth.
- Rub the glaze onto the headlight in a circular motion. Rub for about a minute or two, and then use another clean cloth to wipe off the residue. It may take a few additional applications of the hand glaze to remove all of the haze. Continue this step until your headlight looks like this:
- Apply the 3M Swirl Remover to the orbital buffer (optional). The necessity of this step is debatable, but may help remove any final imperfections that the wet sanding didn't take care of.
- Buff the surface of the headlight using the swirl remover (optional). Run the orbital buffer over the complete surface of the headlight. You will notice the lens will start becoming hazy again.
- Re-apply the 3M Imperial Hand Glaze. Just like you did after the wet sanding, use the hand glaze to remove the haze from the surface of the headlight until all of the haze is gone.
After Hand Glaze

Apply Polish and Carnauba Wax[edit]
- Apply the Meguire's Polish to a clean terry cloth.
- Rub the polish onto the headlight in a circular motion. You will begin to see real shine start to come back to your headlights. After applying one coat of polish, you may wish to apply another coat of Hand Glaze (which is optional, but may further help clean them up).
- Apply the Mothers California Gold Pure Carnauba Wax to the headlight. The wax is used to help protect the headlight lens from future damage. Apply several layers, and remove any excess with a clean microfiber cloth.
Enjoy your brand new looking headlights!
Restore Glass Headlights on a 1994 Mitsubishi 3000GT/GTO and Dodge Stealth[edit]
Cleaning the 94 (glass) headlights is a somewhat simple task, but time consuming. First, pre-heat your oven to 250 Degrees. Now remove the light bulbs from the back of the lights, remove the lights from the car. Clean all the crap off of the outside with a wet towel or something. Remove the stainless stell clips that hold the 2 peices of the light together by either using a screwdriver or needlenose pliers, I used the needlenose pliers b/c it was a bit easier. Place the light(s) in the oven for 5-10 minutes to soften the sealing compound that bonds the glass to the plastic, you have to kinda do this next part in a hurry, you might get your hands burned a bit, I used 2 oven mits, 2 small flat head screwdrivers, and a decent pocket knife, when you take the light out of the oven, obviously it's gonna be somewhat hot, but you have to get a screwdriver or knife inbetween the two and seperate them, I also had a razor blade to cut the bonding compound while I was separating it so I didnt have to really cleanup the glass from the bonding compound snapping back and sticking to the glass, be careful while separating so you dont chip the glass, remember these headlights are $900 each from the dealer (I think), when you separate the glass from the plastic, you will be able to clean both sides, the plastic part and the glass part, for the plastic, it shouldnt be that bad, so I would just clean with windex or something, for the glass, you might have to use steel wool, that's right, steel woll, it didnt scratch it for me or 2 other people around me, so you can test it for yourself, it worked great, and was a million times easier this way, I did however spray invisible glass which is a glass cleaner, and let it soak for about 5 mins before the liquid glass. After cleaning you can now re-assemble, you can just put them back together, and put them in the oven at the same temp for the same time, make sure you have the sealant off of the visible part of the glass (it's still gonna be on the mating surfaces) when you do this, after 5-10 mins in the oven again, take it back out and now push it together enough so that you can get the stainless steel clips back on, then I dont think you have to do this, but I put mine back in for another 5-10 mins just for good measure to make sure they were sealed enough, then put em back in the car, dont spray anything on them when they come out of the oven while they are hot, glass can crack when the temp drastically changes, just a heads up, i'm sure someone can elaborate more on this subject, but if anyone has any questions, you can pm me on 3SI or aim
On a side note. take out the projectors(two for each projector) and clean them as well to get the fog and gunk off them...takes an extra 5 mins but well worth it
Mywetdream 21:02, 14 May 2006 (EDT) Written by Mel16m

