Difference between revisions of "Accessory: Cellular Telephone"
(Add details about the phone's battery pack and AC/DC power supply) |
m (→DiamondTel Model 92 Cellular Telephone) |
||
| Line 38: | Line 38: | ||
</gallery> | </gallery> | ||
| − | Part Number: FZ-1031A<br> | + | Part Number: FZ-1031A (Also used with the Mitsubishi Model 1500 phone)<br> |
Voltage: 6V (x2)<br> | Voltage: 6V (x2)<br> | ||
Capacity: 1.4Ah (1400MAh)<br> | Capacity: 1.4Ah (1400MAh)<br> | ||
Type: NiCD<br> | Type: NiCD<br> | ||
| − | + | ||
Inside of the pack are ten size "A" 1.2V 1400MAh flat-top NiCD battery cells. The cells are arranged into two banks of five cells (6V per bank), with a thermal fuse in series between two cells on each bank. Each bank of cells is completely independent with its own dedicated pair of terminals exposed on the battery pack. It's basically two separate 6V battery packs in one case. | Inside of the pack are ten size "A" 1.2V 1400MAh flat-top NiCD battery cells. The cells are arranged into two banks of five cells (6V per bank), with a thermal fuse in series between two cells on each bank. Each bank of cells is completely independent with its own dedicated pair of terminals exposed on the battery pack. It's basically two separate 6V battery packs in one case. | ||
| Line 66: | Line 66: | ||
</gallery> | </gallery> | ||
| − | Part Number: FZ-1035A<br> | + | Part Number: FZ-1035A (Also used with the Mitsubishi Model 1500 phone)<br> |
Input: 120V AC, 60Hz, 32W<br> | Input: 120V AC, 60Hz, 32W<br> | ||
Output: 12V DC, 2A<br> | Output: 12V DC, 2A<br> | ||
| − | |||
===Make One From a Donor=== | ===Make One From a Donor=== | ||
Revision as of 21:43, November 15, 2020


A Cellular Telephone accessory was available in the 1992 and 1993 model years of the 3000GT/Stealth, making use of a DiamondTel Model 92 portable cellular phone (US market confirmed via documents; other markets unknown). This was not a direct factory option, but an official dealer-installed accessory supported by factory wiring in the car and a special install kit.
Contents
Discussion[edit]
Use this companion thread on the 3si Forums to discuss the Cellular Telephone Accessory:
Factory Cellular Telephone Accessory (DiamondTel Model 92) - 3SWiki Companion Thread
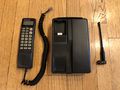
DiamondTel Model 92 Cellular Telephone[edit]
The DiamondTel Model 92 Cellular Telephone is an off-the-shelf cellular phone that can be used as a transportable phone with battery power, or installed in a vehicle as a mobile phone (in the early definition of "mobile" meaning "vehicle-mounted") using a generic mobile installation kit. The phone used analog Advanced Mobile Phone System (AMPS) technology, which was phased out in favor of newer digital technologies starting in 2008. There are no cell phone service providers that can activate this phone.
NOTE: The official installation into the 3000GT uses some special components not included in the generic mobile kit, and connects to factory vehicle wiring instead of using a generic wiring pigtail.
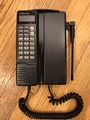
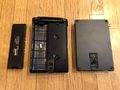
DiamondTel Model 92 in transportable configuration with leather carrying case

Leather carrying case
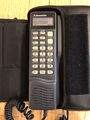
Handset (front)
Handset (back)
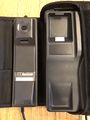
Transportable configuration parts
Portable cover and battery removed
Operating Instructions
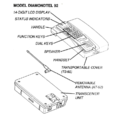
Transportable configuration diagram

Mobile configuration diagram (generic mobile install kit)


.jpg)
.jpg)


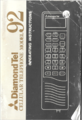
Operating Instructions Manual[edit]
Download a PDF scan of the original Operating Instructions manual for the telephone here for full details of the phone's features, diagrams of parts/accessories, etc.:
DiamondTel Model 92 Cellular Phone Operating Instruction Manual PDF
Battery[edit]
A battery pack allows the phone to be used in transportable mode. The Transportable Cover in which the battery is installed also contains a battery charging circuit that recharges the battery whenever external power is provided.

Label on the battery.

Part Number: FZ-1031A (Also used with the Mitsubishi Model 1500 phone)
Voltage: 6V (x2)
Capacity: 1.4Ah (1400MAh)
Type: NiCD
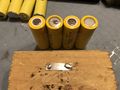
Inside of the pack are ten size "A" 1.2V 1400MAh flat-top NiCD battery cells. The cells are arranged into two banks of five cells (6V per bank), with a thermal fuse in series between two cells on each bank. Each bank of cells is completely independent with its own dedicated pair of terminals exposed on the battery pack. It's basically two separate 6V battery packs in one case.
Rebuild with New Battery Cells[edit]
All original battery packs are undoubtedly dead and unusable by now. It is possible to split the case open at the seam without too much damage so that the battery cells can be replaced.
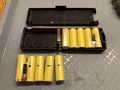
Case split open and one bank of cells removed.
Assembling new cells together with nickel metal strips and solder.

Bank of new cells assembled.


Parts:
- Size "A" 1.2V 1400MAh flat-top NiCD battery cells (x10).
- Nickel strips. I used 0.15x6x50mm strips and cut them shorter as needed.
AC/DC Power Supply[edit]
If you want to test the phone and/or charge its battery pack outside of the car, then you'll want an AC/DC power supply.
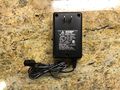
AC/DC Power Supply.

Part Number: FZ-1035A (Also used with the Mitsubishi Model 1500 phone)
Input: 120V AC, 60Hz, 32W
Output: 12V DC, 2A
Make One From a Donor[edit]
If you can't find an original AC/DC power supply, then you can make your own by sacrificing any AC/DC power supply with the same output specs, and modify it using the appropriate connector:
- Molex 39-01-2040 with Molex 39-00-0208 terminals
- Alternatively, use Molex 39-01-3045 if you prefer a black connector.
- Readily available from popular online electronic component supply stores (Mouser, DigiKey, Newark, etc.)
Vehicle Integration Overview[edit]
The cellular telephone accessory is integrated into the vehicle with a combination of factory plug-n-play wiring connectors and special modules/components to provide hands-free telephone conversation functionality:
- A "Hands-Free Module" mounted on the steering column includes a microphone, a button for answering/ending calls, and 3 speed dial buttons.
- Part Number MB876733 from Mitsubishi Electric Corporation.
- Also known as "Hands-Free Controller Box" or "Hand Free Microphone"
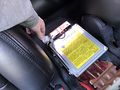
- A handset cradle and mounting bracket installed in the center console storage under the arm rest.
- A telephone wire is already routed from the center console area to the trunk area for easy installation of the telephone handset cradle in the front of the vehicle to be connected to the phone transceiver in the trunk.
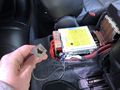
- A "Hands-Free Controller Unit" in the trunk integrates the telephone transceiver with the "Hands Free Module", the telephone handset, and the factory radio/speakers.
- Part Number MB876742 from Mitsubishi Electric Corporation.
- The phone powers on/off automatically with vehicle switched power.
- When in a call, the radio is automatically muted and the phone audio is sent to the front right speakers of the vehicle.
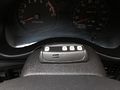
Hands-Free Module
Back side of Hands-Free Module
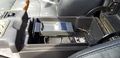
Handset Cradle

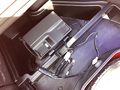
Transceiver and Hands-Free Controller Unit in trunk
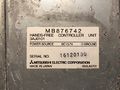
Back side of Hands-Free Controller Unit

.jpg)

.jpg)
Vehicle Wiring/Connectors[edit]
Diagrams[edit]
These are component diagrams and circuit diagrams from the Factory Service Manual related to the Cellular Telephone accessory.
NOTE: Telephone-related wiring/connectors is only present in 1992-1993 model years.
Connector for the Hands-Free Module

Telephone cable for the handset cradle
Connectors for the Transceiver and Hands-Free Controller Unit

Vehicle wiring diagram


Photos of Factory Wiring/Connectors[edit]
These photos provide a good reference for where to find all of the Cellular Telephone connectors in the car.

Connector under the dashboard for the Hands-Free Module, taped and tucked up.

Connector under the dashboard for the Hands-Free Module, unpacked from its hiding place.
Connector under the center console arm rest for the handset cradle, taped and tucked.
Connector under the center console arm rest for the handset cradle, unpacked from its hiding place.

Connectors in the trunk area, taped and tucked up on the rear left side strut tower.

Connectors in the trunk area, taped and tucked up on the rear left side strut tower.

Connectors in the trunk area, unpacked from their hiding place.

Connectors in the trunk area, approximately routed correctly for installation.

.jpg)

.jpg)


.jpg)
.jpg)
Jumper Connector for Front Right Speakers[edit]
One of the connectors in the trunk area allows the Hands-Free Controller Unit to intercept the audio to the front right speakers so that phone audio can be sent to the front right speakers. When not in a call, the Hands-Free Controller Unit acts as a pass-through for the normal audio from the radio. If nothing is plugged into this connector, then the circuit to the front right speakers is incomplete, and there will be no audio from the radio. The car comes from the factory with a jumper connector to simply complete the circuit to the front right speakers.
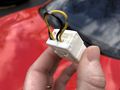
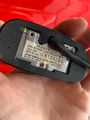
Back side of the jumper connector.

Front side of the jumper connector.
Jumper connector installed as originally from the factory.
.jpg)
.jpg)
If you have a 92-93 3000GT/Stealth with non-functional front right speakers, then it is possible that the Cellular Telephone accessory was previously installed, then removed without re-installing the jumper connector. You can fix this by making a replacement jumper connector using part# 174931 from TE Connectivity. See above photos for guidance on positioning of wires within the connector.
Power Supply Wiring[edit]
The factory wiring for the Cellular Telephone does not have the correct style of connector to plug directly into the transceiver's power supply socket. The official install kit included an extension/adapter wiring harness.
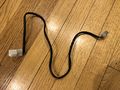
Power supply wiring extension/adapter.
Power supply wiring connected (Hands-Free Controller Unit omitted for simplicity).


If you cannot find an original power supply extension/adapter, then you can make your own with the following parts:
- Yazaki 7122-8345 (vehicle-side connector)
- The only place I found that would sell in small quantities is AutoClick in the UK (includes terminals).
- Molex 39-01-2040 (transceiver-side connector) with Molex 39-00-0208 terminals
- Alternatively, use Molex 39-01-3045 if you prefer a black connector.
- Readily available from popular online electronic component supply stores (Mouser, DigiKey, Newark, etc.)
- 1/4" PVC wiring sleeve (length TBD).
- Wire (length and gauge TBD).
Alternate Handset Installation with Readily Available Aftermarket Mount[edit]
If you can't find the correct OEM bracket for mounting the handset under the arm rest, then you can use the PanaVise Model# 727-06SF Slimline Small Foot Pedestal Mount instead. The PanaVise Slimline line of mounts was first introduced in 1988[1], so this mount should be very close to a period-correct aftermarket mount for our early 90's cars.
Use four black screws, size 8-32 x 1/2", with matching size washers and nuts to bolt down the foot of the mount.
OEM Location[edit]
The PanaVise Model# 727-06SF Slimline Small Foot Pedestal Mount can be used to position the handset in the OEM location under the arm rest.

.jpg)
Alternate Location (side of center console)[edit]
The PanaVise Model# 727-06SF Slimline Small Foot Pedestal Mount can also be used to position the handset on the side of the center console. The side carpet piece must be removed to bolt the foot of the mount onto it. The plastic backing of the carpet is quite sturdy and supports the mount and handset well. Position the handset carefully so that the glove box can be opened.

.jpg)
.jpg)
Pros:
- The handset is on full display for maximum enjoyment as a conversation starter.
- Does not take up space in the arm rest storage compartment.
- This is a typical aftermarket install location for car phone handsets, so it is "period correct".
- If the phone was hypothetically usable, then this location is more readily/conveniently accessible than under the arm rest.
Cons:
- Intrudes into passenger leg room slightly.
- Interferes with sliding the passenger seat forward to access the rear seat area. Definitely unhook the handset from the cradle and set it aside on the center console before sliding the passenger seat forward to avoid damaging the handset cord. The foot of the mount may also still prevent the seat from sliding all the way forward, depending on exactly where you position it.
- It's not the official OEM location.