Seats: Replace Leather Seat Covers
Note: Under Construction !!!!
If your 3S has the original leather on seats, then there is a very good chance it needs replaced. Below are some instructions, much of it copied from a forum thread by deft spyder --> http://www.3si.org/forum/f58/aftermarket-leatherseats-com-leather-interior-instllation-guide-pics-307275/
Other links with good info: http://www.leatherseats.com/installation.asp
Hannibalzero created a thread after I started this Wiki, he has done a VERY good job at describing the process:
http://www.3si.org/forum/f120/hannibals-guide-replacing-cloth-seats-covers-460579/#post5418285
I am considering simply copy/pasting his instructions to this Wiki, with his permission. (so for now, I am holding off on working on this, until his is finished)
Tools[edit]
There are a number of common tools needed to remove the seats from the car etc. For now, listed below are some of the not-so-common ones.
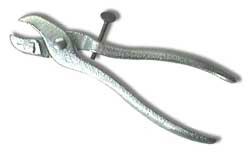
| One version of hog-ring pliers. | |
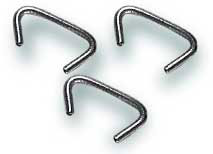
| Not really a tool, but this is what hog-rings look like. | |
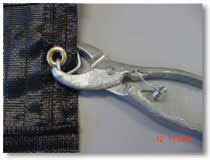
| Ring installed in pliers. | |
| Another version of hog-ring pliers. | File:SeatTool04.jpg Hog-ring pliers |
Procedure[edit]
Where to start, where to start…
Start in the back. As you well know the back seat of a 3000GT is best suited for newborns and those shorter than 4 foot nothing. Chances are while you the new leather for the back seats you wont miss them too much. Why did it take me three hours? Mostly because I was enjoying the learning curve, seeing how the stock leather it attached to the car, etc. Once you get a good idea for how the stock leather is attached with the stock hog rings, you'll have a good idea for how the rest of the project is going to go… just different places for the rings to be. This comes fairly quickly because it's pretty obvious.
I should probably mention that I brought my back seats in from the garage and did the entirety of this project sitting on my couch watching movies. There's no reason why this can't be a relaxing project, and frankly, rushing it won't help at all. Take your time, and it'll be better served all the way around. I did the 'seat back' of the back seat first.
The leather for the back seats comes off like unwrapping a package. As you cut all the rings it will unwrap slowly, and then you can pull it off. Be careful that you pay attention to where the rings were, what they were holding onto, etc. This will help things to be more intuitive when you put the new leather on as you'll have an idea of what they are talking about.
Chances are the old hog rings were attached to a metal wire. These hard metal wires go throughout all of the different areas of your interior and form a skeleton for which the leather attaches too. Some of the other things the leather will hog-ring too is parts of the metal lacing that runs through the backs of the interior. This part looks most like what a bed spring pattern looks like.
| 1. How do you get the seat somewhere to work on? First, get the seat out of the car by removing the 4 bolts holding it to the car. Look underneath as power seats have some wires that need to be disconnected. The connectors are easily visible. They are easier to get at if you unbolt the seat first and tilt it back to get underneath. | File:Seats01.jpg Step 1. Remove Seat |
More to come later


