Tuning: Install Innovate LC1 Wideband Controller
The Innovate LC1 Wideband Controller is probably the least expensive and easiest to use wideband 02 controller. It does not come with a display. Since the MAFT Pro has wideband display the LC1 wideband is a great match for it.
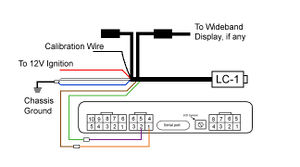
Here is how you connect the LC1 wideband controller to the MAFTPro.
Wiring Guide[edit]
LC1 WIRING------------------------------ MAFT PRO WIRING
- Red ( 12V Supply ) ------------------ 12V Ignition power
- Blue (Heater Ground ) -------------- To good chassis ground
- White ( System ground ) ----------- To good chassis ground, Connect to Blue wire on LC-1
- Yellow ( Analog Out 1 ) ------------- N/A ( not used, connects to nothing )
- Brown ( Analog out 2 ) -------------- Orange ( connects directly to PIN 1 in MAFT 10 pin connector)
- Green ( Analog Ground ) ----------- Purple ( connects directly to PIN 2 in MAFT 10 pin connector)
- Black (calibration Wire) ------------- SEE LED monitor connections below
Momentary Switch[edit]
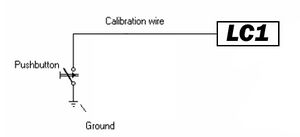
The Momentary switch is used to calibrate the LC1 unit to the Wideband
The black wire on the LC1 harness ( which is the calibration wire ) will connect to one side of the momentary switch. Now, run another wire from the other side of the momentary switch to a good ground.
LED Monitor[edit]
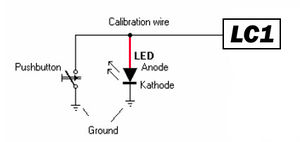
The LED light shows you the status of the LC1, it is not required tomake the unit work but I would recommend installing it so you can at least see it when claibrating the LC1.
Connect the RED Wire on the LED (Anode Side) to the Calibbration wire on the LC1 Harness. Connect the BLACK WIRE on the LEAD (Cathode Side)to a good ground on the chassis.
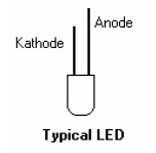
You can also use any other 1.2V to 2.2V (1mA to 30mA) LED you want. The cathode side is normally the shorter wire.
First Time Use[edit]
- Do NOT connect the O2 Sensor to the Wiring YET!, Do NOT mount the 02 sensor in the Exhaust YET!
- Turn on the ignition (but don't start car) and wait for 10 seconds, Note the LC1 must be connected to ignition power.
- Turn the ignition off after 10 Seconds
- Connect the 02 sensor to the LC1 Wiring. The LC1 MUST be calibrated with the O2 sensor in FREE AIR to be accurrate. It is BEST if you remove the 02 sensor completely fromm the exhaust, but it can be calibrated in the exhaust if the car has not ran in 6 HOURS. I recommend just removing it from the car.
- Turn the ignition on and wait for 2 minutes. The LED will blink steadily while the 02 sensor warms up. The LED will turn off breifly as the 02 sensor is calibrated. The LED stays on once calibration is done. IF the LED blinks a fixed number of pulses then turns off for 2 seconds and then repeats, there is an error see the appendix of the LC1 instructions for diagnostic.
- Install 02 sensor into exhaust.
Calibration[edit]
To insure accuracy the Sensor should be recalibrated regularly. NOTE: If the Sensor is replaced with a new sensor follow the first time use instructions above.
- The LC1 MUST be calibrated with the O2 sensor in FREE AIR to be accurrate. It is BEST if you remove the 02 sensor completely fromm the exhaust, but it can be calibrated in the exhaust if the car has not ran in 6 HOURS. I recommend just removing it from the car.
- Turn the ignition on and wait for 02 sensor to heat up,LED light will come on steady when completely heated.
- Push momemtary switch for a second, The LED will go off and come back on after calibration is finished.
- Install O2 sensor (if removed)
- Turn ignition off and wait for 30 seconds before starting car.
To connect your laptop to the Pro just use the cable that came with the TPro and plug it in the top of the Pro and the other end to your laptop. Open the Tuner Pro program and it will automatically detect the TPro. Now, click File in the top left corner and click Open Bin. Then open the bin " tpro 4xxx" for whatever version of the TPro you are running. Be sure to select the proper XDF and ADS files for the version of the TPro you are running. Then all you do is click Connect to ALDL and there you are.


