Uncategorized files
Jump to navigation
Jump to search
Showing below up to 500 results in range #1 to #500.
View (previous 500 | next 500) (20 | 50 | 100 | 250 | 500)
 007.jpg 800 × 600; 93 KB
 019.jpg 900 × 600; 94 KB
 01baseesmodels.jpg 576 × 156; 85 KB
 02rtttmodels.jpg 576 × 156; 74 KB
 037.jpg 900 × 600; 96 KB
 03baseesrtrtttengines.jpg 576 × 200; 51 KB
 040.jpg 900 × 600; 95 KB
 055.jpg 900 × 600; 102 KB
 0711081730a.jpg 864 × 576; 118 KB
 0711081731a.jpg 900 × 600; 128 KB
 0712081358.jpg 900 × 600; 128 KB
 09aprilrotm tn.jpg 200 × 132; 9 KB
 09augrotm tn.jpg 200 × 155; 11 KB
 09decrotm tn.jpg 200 × 112; 8 KB
 09febrotm tn.jpg 200 × 132; 8 KB
 09janrotm tn.jpg 200 × 133; 10 KB
 09julyrotm-tn.jpg 200 × 133; 10 KB
 09junerotm tn.jpg 200 × 150; 9 KB
 09marchrotm tn.jpg 200 × 150; 10 KB
 09mayrotm tn.jpg 200 × 150; 10 KB
 09novrotm tn.jpg 200 × 119; 8 KB
 09octrotm tn.jpg 200 × 134; 8 KB
 09rotmbanner.jpg 764 × 234; 44 KB
 09septrotm tn.jpg 200 × 134; 9 KB
 10-25-2009 10-58-04.jpg 600 × 400; 61 KB
 100 1017.jpg 900 × 600; 113 KB
 112 1231.jpg 900 × 600; 63 KB
 112 1255.jpg 900 × 600; 48 KB
 112 1262.jpg 900 × 600; 59 KB
 114.jpg 629 × 419; 81 KB
 123456.jpg 900 × 600; 184 KB
 128.jpg 678 × 452; 99 KB
 1320 tn.jpg 200 × 150; 11 KB
 1320vr4 tn.jpg 200 × 150; 15 KB
 1320vr4 tn 10.jpg 200 × 150; 10 KB
 1320vr4vr4 tn.jpg 200 × 150; 10 KB
 13Gvs13C.png 851 × 673; 65 KB
 13Gvs13T.png 844 × 669; 58 KB
 13Gvs15G.png 855 × 673; 59 KB
 13Gvs19T.png 859 × 597; 34 KB
 13Gvs9B-360vs450.png 846 × 679; 79 KB
 13Gvs9B-demand.png 844 × 673; 66 KB
 13Gvs9B.png 847 × 676; 61 KB
 13Tvs15G.png 845 × 644; 43 KB
 16Tvs18Tvs19T.png 850 × 671; 31 KB
 1993 3000GT Brochure - Cellular Telephone.png 271 × 163; 111 KB
 1993 Accessories Brochure - Cellular Telephone.png 401 × 290; 254 KB
 1g Diagram.jpg 569 × 162; 19 KB
 1stautox.jpg 900 × 600; 89 KB
 2001Black.jpg 200 × 200; 25 KB
 2002 3S National Gathering Banner 1.gif 468 × 60; 72 KB
 2002 3S National Gathering Banner 2.gif 468 × 60; 41 KB
 2002 3S National Gathering Logo.jpg 543 × 153; 44 KB
 2003 3S National Gathering Banner 1.gif 468 × 60; 67 KB
 2003 3S National Gathering Banner 2.gif 468 × 60; 124 KB
 2003 3S National Gathering Logo.jpg 252 × 248; 61 KB
 2004 3S National Gathering Logo.jpg 216 × 112; 26 KB
 2004formula tn.jpg 200 × 133; 9 KB
 2005 3S National Gathering Banner.gif 468 × 60; 169 KB
 2006ROTMheader.jpg 764 × 234; 44 KB
 2006 3S National Gathering Logo.jpg 360 × 115; 32 KB
 2008 3S National Gathering Banner.gif 468 × 60; 34 KB
 2008 3S National Gathering Logo.jpg 600 × 249; 101 KB
 2008 3S National Gathering T-Shirt Logo.jpg 768 × 677; 416 KB
 2009ROTMheader.jpg 764 × 234; 44 KB
 2009 3S National Gathering Logo Ron.jpeg 800 × 514; 67 KB
 200p-112 1231.jpg 200 × 132; 10 KB
 2010 3S National Gathering T-Shirt Back.jpg 800 × 786; 240 KB
 2010 cover.jpg 3,500 × 2,300; 4.17 MB
 2011 3S National Gathering Banner.gif 468 × 60; 109 KB
 2011 cover.png 3,500 × 2,300; 4.51 MB
 2012 3S National Gathering T-Shirt Logo.jpg 808 × 960; 137 KB
 2013 3S National Gathering Preview.jpg 720 × 1,084; 191 KB
 2013 3S National Gathering T-Shirt Logo.jpg 2,048 × 1,668; 313 KB
 2014 3S National Gathering T-Shirt Logo.jpg 1,060 × 1,106; 703 KB
 2015 3S National Gathering T-Shirt Logo.jpg 2,048 × 961; 184 KB
 2016 3S National Gathering Logo.jpg 392 × 250; 23 KB
 20210124 191247.jpg 942 × 706; 174 KB
 3000GT-Digital AC Circuit-C17-TR3-R58-R59-R60-R61-R63-R64-R66-R67.jpg 1,080 × 720; 262 KB
 3000GT-Digital AC Circuit-C17-TR3-R63-R66-R67.jpg 1,050 × 700; 224 KB
 3000GT-Digital AC Circuit-R46-R48-R49-R50-R54-R55-R56-R57-D5-D6-D7.jpg 1,080 × 720; 291 KB
 3000GT-Digital AC Circuit-TR2-R38.jpg 1,080 × 719; 217 KB
 3000GT-Stealth O2 Sensor OEM Diagram.png 500 × 450; 22 KB
 3000GT 03 18 099.jpg 900 × 494; 101 KB
 3000GT Stealth International-3SI-Screenshot-2004-04-Light.png 818 × 2,457; 652 KB
 3000GTinstall.gif 768 × 566; 12 KB
 3000gt-stealth engine-fuse-box-cover.jpg 486 × 640; 136 KB
 3000gt abs.jpg 640 × 640; 71 KB
 39766 1561390117336 1312807990 31526836 4614388 n.jpg 542 × 361; 23 KB
 3KGTRemoteprogrammingw.data link.jpg 552 × 1,312; 151 KB
 3SWiki Create Tab.png 221 × 86; 9 KB
 3SWiki Edit Buttons.png 279 × 52; 11 KB
 3SWiki Edit Tab.png 233 × 85; 10 KB
 3SWiki Editing Header Example.png 615 × 48; 12 KB
 3SWiki Editing Header Example 2.png 454 × 42; 7 KB
 3SWiki Editing Header Example 3.png 303 × 28; 5 KB
 3SWiki Editing Toolbar.png 682 × 89; 22 KB
 3SWiki Upload Guide 1.png 460 × 137; 17 KB
 3SWiki Upload Guide 2.png 574 × 268; 17 KB
 3SWiki Upload Guide 3.png 365 × 96; 9 KB
 3SWiki Upload Guide 4.png 81 × 25; 5 KB
 3k1.jpg 578 × 450; 43 KB
 3k2.jpg 600 × 450; 39 KB
 3k3.jpg 537 × 450; 50 KB
 3k4.jpg 600 × 450; 36 KB
 3k5.jpg 600 × 450; 29 KB
 3k6.jpg 600 × 450; 32 KB
 3k7.jpg 600 × 450; 27 KB
 3kgt2nv tn.jpg 200 × 150; 7 KB
 3kgtcruiser tn.jpg 200 × 134; 9 KB
 3kprime1-3000GT-VR4-Driver-Side1.jpg 800 × 450; 146 KB
 3kprime1-3000GT-VR4-Driver-Side2.jpg 980 × 456; 194 KB
 3kprime1-3000GT-VR4-Driver-Side3.jpg 900 × 546; 205 KB
 3kprime1-3000GT-VR4-Driver-Side4.jpg 838 × 496; 158 KB
 3kprime1-3000GT-VR4-Engine-Bay.jpg 900 × 671; 247 KB
 3kprime1-3000GT-VR4-Engine-Bay2.jpg 480 × 359; 35 KB
 3kprime1-3000GT-VR4-Engine-Bay3.jpg 960 × 717; 109 KB
 3kprime1-3000GT-VR4-Engine-Bay Old.jpg 960 × 720; 98 KB
 3kprime1-3000GT-VR4-Front1.jpg 1,023 × 764; 261 KB
 3kprime1-3000GT-VR4-Front2.jpg 1,023 × 764; 201 KB
 3kprime1-3000GT-VR4-Front3.jpg 1,023 × 764; 219 KB
 3kprime1-3000GT-VR4-Front Old.jpg 960 × 720; 104 KB
 3kprime1-3000GT-VR4-Hatch Old.jpg 960 × 720; 81 KB
 3kprime1-3000GT-VR4-Hood.jpg 1,023 × 764; 232 KB
 3kprime1-3000GT-VR4-Interior.jpg 900 × 671; 231 KB
 3kprime1-3000GT-VR4-Interior1 Old.jpg 960 × 720; 98 KB
 3kprime1-3000GT-VR4-Interior2 Old.jpg 960 × 720; 98 KB
 3kprime1-3000GT-VR4-Passenger-Side1.jpg 1,024 × 576; 272 KB
 3kprime1-3000GT-VR4-Passenger-Side2.jpg 1,024 × 576; 235 KB
 3kprime1-3000GT-VR4-Passenger-Side3.jpg 900 × 507; 173 KB
 3kprime1-3000GT-VR4-Passenger-Side4.jpg 1,024 × 765; 93 KB
 3kprime1-3000GT-VR4-Passenger-Side5.jpg 1,024 × 765; 84 KB
 3kprime1-3000GT-VR4-Passenger-Side6.jpg 960 × 717; 88 KB
 3kprime1-3000GT-VR4-Passenger-Side7.jpg 873 × 463; 140 KB
 3kprime1-3000GT-VR4-Rear1.jpg 800 × 450; 143 KB
 3kprime1-3000GT-VR4-Rear2.jpg 900 × 506; 161 KB
 3kprime1-3000GT-VR4-Rear3.jpg 960 × 717; 136 KB
 3kprime1-3000GT-VR4-Trailer Old.jpg 960 × 720; 80 KB
 3kprime1-Plenum-Wrinkle-Black.jpg 1,023 × 764; 298 KB
 3kprime1-Transfer-Case-Cleaned-Painted.jpg 747 × 420; 176 KB
 3kprime1-Transmission-Engine-OEM-Rebuild-020-Over.jpg 800 × 597; 191 KB
 3kprime1-Transmission-Wrinkle-Black.jpg 800 × 597; 250 KB
 3sss.jpg 564 × 284; 24 KB
 3swiki-logo.jpg 500 × 341; 41 KB
 4-Stroke-Engine.gif 154 × 334; 404 KB
 4813267696 15f2c0b402 b.jpg 900 × 600; 94 KB
 5-5-2009101110PM.jpg 669 × 944; 83 KB
 5pi.jpg 900 × 600; 68 KB
 6230410.gif 510 × 356; 6 KB
 8-183.jpg 447 × 615; 52 KB
 8-184.jpg 448 × 615; 47 KB
 8-185.jpg 450 × 615; 49 KB
 800p-Hood1.jpg 900 × 600; 107 KB
 88cb7599de6efca0-original.jpg 538 × 359; 61 KB
 91Wiring.jpg 400 × 150; 39 KB
 92rttt tn.jpg 200 × 150; 44 KB
 93ECU1.jpg 800 × 600; 129 KB
 93ECU2.jpg 800 × 533; 109 KB
 94ttinga tn.jpg 200 × 150; 50 KB
 95VR4Spyder.jpg 640 × 291; 63 KB
 97vr4ABS.jpg 640 × 480; 27 KB
 99VR4.jpg 575 × 365; 73 KB
 99vr4-production-numbers.JPG 786 × 881; 69 KB
 9b boost falloff.gif 700 × 474; 23 KB
 A1320vr4 tn.jpg 200 × 150; 10 KB
 AEM pin1.jpg 642 × 775; 146 KB
 Aaronatstate4.jpg 863 × 575; 122 KB
 Aaronatstate5.jpg 900 × 600; 116 KB
 Aaronatstate6.jpg 900 × 600; 85 KB
 Aaronatstate8.jpg 900 × 675; 114 KB
 Aaronatstate tn.png 200 × 157; 61 KB
 Aaronstate tn.jpg 200 × 132; 9 KB
 ActiveExhaustDiagram.jpg 800 × 593; 75 KB
 ActiveExhaustMuffler.jpg 640 × 480; 30 KB
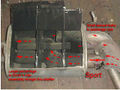 ActiveExhaustSport.jpg 640 × 480; 57 KB
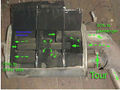 ActiveExhaustTour.jpg 640 × 480; 57 KB
 Advanced Keys-Access-Bypass-Regular Key-Comparison.jpg 1,080 × 649; 37 KB
 Aem pin.jpg 567 × 267; 33 KB
 Aem pin2.jpg 800 × 818; 179 KB
 Aempic.jpg 429 × 300; 21 KB
 Airflowadjustment1.jpg 740 × 332; 122 KB
 Airflowadjustment2.jpg 740 × 334; 126 KB
 Alarm disable 1.jpg 800 × 600; 96 KB
 Alarm disable 2.jpg 800 × 600; 99 KB
 Alt0id tn.jpg 200 × 104; 12 KB
 Angled.jpg 600 × 400; 60 KB
 April08 tn.jpg 200 × 127; 13 KB
 AprilROTM ROTYtn.jpg 200 × 134; 51 KB
 Archangel tn.jpg 200 × 133; 44 KB
 Audiblesilence.jpg 200 × 150; 29 KB
 August08 tn.jpg 200 × 150; 17 KB
 AugustROTM ROTYtn.jpg 200 × 150; 29 KB
 Autoxnight.jpg 800 × 485; 60 KB
 Axle2s.jpg 600 × 362; 36 KB
 Az1aN3000GT01.jpg 606 × 404; 48 KB
 Az1aN3000GT02.jpg 717 × 538; 89 KB
 Az1an tn.jpg 200 × 150; 61 KB
 BRG 2006-1.jpg 675 × 900; 182 KB
 BRG 2006-2.jpg 400 × 267; 22 KB
 BRG 2006-3.jpg 600 × 399; 53 KB
 BRG 2006-4.jpg 900 × 600; 227 KB
 Back regulator.JPG 894 × 756; 156 KB
 Badass3000.jpg 200 × 160; 23 KB
 Badass tn.jpg 200 × 110; 46 KB
 Banner.jpg 1,080 × 1,080; 141 KB
 BaroSensor1.gif 759 × 646; 48 KB
 BaroSensor2.gif 797 × 187; 14 KB
 BaroSensor3.gif 766 × 365; 21 KB
 BaroSensor4.gif 762 × 650; 40 KB
 Bboyalan tn.jpg 200 × 150; 8 KB
 Bdillon2.jpg 900 × 599; 118 KB
 Bdillon5.jpg 900 × 600; 106 KB
 Bdillon6.jpg 900 × 600; 100 KB
 Bdillon8.jpg 600 × 400; 91 KB
 Billcar1.jpg 600 × 450; 60 KB
 Billvr4 tn.jpg 200 × 150; 16 KB
 BjarkiTN.jpg 200 × 153; 10 KB
 Bjdmp tn.jpg 200 × 150; 7 KB
 Blackcar1.jpg 900 × 675; 148 KB
 Blackcar2.jpg 900 × 679; 135 KB
 Blackcar3.jpg 900 × 679; 139 KB
 Blackcar4.jpg 900 × 679; 134 KB
 Blackcarcrash.jpg 900 × 600; 158 KB
 Blackjdmpower tn.jpg 200 × 150; 53 KB
 Blade tn.jpg 200 × 150; 14 KB
 Blant tn.jpg 200 × 150; 54 KB
 Blue-2.jpg 900 × 600; 155 KB
 Boost4vr4 tn.jpg 200 × 141; 11 KB
 BoostCut.jpg 743 × 109; 22 KB
 Boostaddict tn.jpg 200 × 150; 13 KB
 BrakeClear.jpg 640 × 427; 54 KB
 Brakecaliper.jpg 900 × 600; 173 KB
 Bridge tn.jpg 200 × 131; 12 KB
 Bslade3.jpg 800 × 600; 49 KB
 Buckeye2 tn.jpg 150 × 112; 6 KB
 BuckeyeNA tn.jpg 200 × 150; 15 KB
 Buckeye tn.jpg 200 × 150; 11 KB
 Buckeyestealth tn.jpg 199 × 150; 54 KB
 Bullet connector.jpg 900 × 600; 75 KB
 Bullet connector connected.jpg 900 × 600; 53 KB
 BurntClimate.jpg 800 × 533; 95 KB
 Bushing in Grinder.JPG 1,024 × 768; 235 KB
 Bushing in grinder.jpg 582 × 404; 91 KB
 Buzzer-removal.jpeg 1,175 × 881; 155 KB
 Byebye.jpg 597 × 398; 49 KB
 Byebyesti tn.jpg 200 × 132; 12 KB
 Byebyestis 1.jpg 200 × 132; 9 KB
 Byjrwiring1.jpg 614 × 459; 42 KB
 Byjrwiring2.jpg 597 × 457; 44 KB
 Byjrwiring6.JPG 467 × 452; 39 KB
 CAS01.gif 676 × 568; 26 KB
 CAS02.gif 764 × 251; 24 KB
 CAS03.gif 772 × 209; 9 KB
 CAS04.gif 760 × 641; 35 KB
 CAS05.gif 765 × 604; 30 KB
 CAS06.gif 778 × 431; 33 KB
 CAS07.gif 760 × 649; 31 KB
 CAS08crank.gif 676 × 565; 24 KB
 CAS09crank.gif 780 × 456; 42 KB
 CAS10crank.gif 767 × 518; 30 KB
 CAS11crank.gif 772 × 224; 9 KB
 CAS12crank.gif 759 × 647; 33 KB
 CAS13crank.gif 723 × 622; 46 KB
 CAS14crank.gif 763 × 372; 16 KB
 CAS15crank.gif 761 × 418; 21 KB
 CTY 9236.jpg 900 × 596; 101 KB
 CTY 9236 (1).jpg 900 × 599; 78 KB
 CTY 9240.jpg 882 × 588; 60 KB
 Cable 1g example.png 1,379 × 465; 206 KB
 Cable built.jpg 972 × 648; 198 KB
 Cage.jpg 900 × 600; 88 KB
 CageRF.jpg 900 × 600; 117 KB
 CageRR.jpg 900 × 600; 114 KB
 Calendar Cover 2013.jpeg 3,500 × 2,300; 3.72 MB
 Caliper finished1.jpg 450 × 300; 36 KB
 Caliper finished2.jpg 900 × 600; 93 KB
 Caliper marked1.jpg 900 × 600; 126 KB
 Caliper marked2.jpg 900 × 600; 93 KB
 Capacitor.jpg 245 × 112; 7 KB
 Capaddsolder.jpg 509 × 381; 63 KB
 Capbendleads.jpg 512 × 310; 43 KB
 Capblowup.jpg 703 × 238; 53 KB
 Capcleanup.jpg 515 × 311; 46 KB
 Cappolarity.jpg 505 × 337; 46 KB
 Cappryout.jpg 514 × 327; 52 KB
 Capsolderin.jpg 509 × 298; 44 KB
 Capsoldersuck.jpg 506 × 375; 56 KB
 Capsreplaced.jpg 150 × 252; 14 KB
 Capusingbraid.jpg 509 × 335; 53 KB
 Carnage tn.jpg 200 × 150; 41 KB
 Carrier bearing-dust shield.jpg 500 × 375; 54 KB
 Carrier bearing-front.jpg 600 × 450; 66 KB
 Carrier bearing-front companion marked.jpg 633 × 475; 84 KB
 Carrier bearing-front companion nut.jpg 600 × 450; 77 KB
 Carrier bearing-front companion puller.jpg 600 × 450; 73 KB
 Carrier bearing-front companion removed.jpg 563 × 422; 69 KB
 Carrier bearing-front puller.jpg 800 × 600; 87 KB
 Carrier bearing-front rear connected.jpg 600 × 450; 97 KB
 Carrier bearing-front rear disconnected.jpg 600 × 450; 89 KB
 Carrier bearing-front removed.jpg 600 × 450; 68 KB
 Carrier bearing-front rubber bracket removed.jpg 600 × 450; 57 KB
 Carrier bearing-frontshaft transfercase.jpg 800 × 600; 90 KB
 Carrier bearing-install.jpg 600 × 450; 70 KB
 Carrier bearing-lobro companion unbolted.jpg 800 × 600; 90 KB
 Carrier bearing-lobro marked.jpg 600 × 450; 75 KB
 Carrier bearing-outer rubber.jpg 800 × 600; 86 KB
 Carrier bearing-rear.jpg 600 × 450; 51 KB
 Carrier bearing-rear companion nut.jpg 700 × 525; 78 KB
 Carrier bearing-rear companion nut removed.jpg 600 × 451; 62 KB
 Carrier bearing-rear companion puller.jpg 600 × 450; 53 KB
 Carrier bearing-rear removed.jpg 600 × 450; 67 KB
 Carrier bearing-rearshaft diff.jpg 600 × 450; 54 KB
 Carrier bearing-shaft removed.jpg 600 × 450; 76 KB
 Cd changer.jpg 729 × 551; 63 KB
 Cellular Telephone - Connectors - Console.jpg 4,032 × 3,024; 3.81 MB
 Cellular Telephone - Connectors - Console (unpacked).jpg 4,032 × 3,024; 3.37 MB
 Cellular Telephone - Connectors - Dash.jpg 4,032 × 3,024; 2.4 MB
 Cellular Telephone - Connectors - Dash (unpacked).jpg 4,032 × 3,024; 2.95 MB
 Cellular Telephone - Connectors - Trunk (routed).jpg 4,032 × 3,024; 2.94 MB
 Cellular Telephone - Connectors - Trunk (unpacked).jpg 4,032 × 3,024; 3.12 MB
 Cellular Telephone - Connectors - Trunk 1.jpg 4,032 × 3,024; 3.1 MB
 Cellular Telephone - Connectors - Trunk 2.jpg 4,032 × 3,024; 2.43 MB
 Cellular Telephone - Cradle - Back.jpg 4,032 × 3,024; 3.76 MB
 Cellular Telephone - Cradle - Bottom.jpg 4,032 × 3,024; 2.81 MB
 Cellular Telephone - Cradle - Front.jpg 4,032 × 3,024; 3.98 MB
 Cellular Telephone - Cradle - Side.jpg 4,032 × 3,024; 3.58 MB
 Cellular Telephone - Handset Aftermarket Mount.jpg 4,032 × 3,024; 3.72 MB
 Cellular Telephone - Handset Aftermarket Mount (side view).jpg 4,032 × 3,024; 3.61 MB
 Cellular Telephone - Handset Alternate Location.jpg 4,032 × 3,024; 3.79 MB
 Cellular Telephone - Handset Alternate Location (foot closeup).jpg 4,032 × 3,024; 3.63 MB
 Cellular Telephone - Handset Alternate Location (side view).jpg 4,032 × 3,024; 3.95 MB
 Cellular Telephone - Power Supply Wiring Adapter.jpg 4,032 × 3,024; 4.32 MB
 Cellular Telephone - Power Supply Wiring Connected.jpg 4,032 × 3,024; 3.05 MB
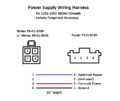 Cellular Telephone - Power Supply Wiring Harness Diagram.png 710 × 599; 21 KB
 Cellular Telephone - Speaker Jumper Connector (back).jpg 4,032 × 3,024; 1.98 MB
 Cellular Telephone - Speaker Jumper Connector (front).jpg 4,032 × 3,024; 2.22 MB
 Cellular Telephone - Transceiver Mounting Plate.jpg 1,813 × 1,393; 1.27 MB
 Cellular Telephone - Transceiver Without Hands-Free.jpg 4,032 × 3,024; 2.94 MB
 Cellular Telephone - Transceiver Without Hands-Free - Connections.jpg 4,032 × 3,024; 3.08 MB
 Cellular Telephone - Vehicle Circuit Diagram.png 733 × 998; 98 KB
 Cellular Telephone - Vehicle Connector Diagram - Console.png 715 × 934; 80 KB
 Cellular Telephone - Vehicle Connector Diagram - Dash.png 714 × 938; 178 KB
 Cellular Telephone - Vehicle Connector Diagram - Trunk.png 777 × 1,012; 136 KB
 Center Garnish Restoration-GTO-After-1.jpg 1,024 × 292; 46 KB
 Center Garnish Restoration-GTO-After-2.jpg 1,024 × 272; 38 KB
 Center console-side carpet before.jpg 800 × 600; 105 KB
 Center console-underside carpet.jpg 800 × 600; 94 KB
 Center console-ziptied wires.jpg 800 × 600; 79 KB
 Centerconsole.jpg 508 × 690; 89 KB
 Chester22 tn.jpg 200 × 150; 11 KB
 Chm.jpg 900 × 600; 97 KB
 Climate1.jpg 800 × 600; 104 KB
 Climate1WattResistor.jpg 800 × 600; 93 KB
 Climate2.jpg 800 × 600; 99 KB
 Climate3.jpg 800 × 600; 107 KB
 Climate4.jpg 800 × 600; 103 KB
 ClimateNewDiodes.jpg 800 × 600; 93 KB
 ClimateScrewLocations.jpg 800 × 333; 41 KB
 ClimateScrews1.jpg 800 × 345; 70 KB
 ClimateScrews2.jpg 800 × 600; 98 KB
 ClimateVFD.jpg 800 × 374; 71 KB
 Clock spring-installed.jpg 800 × 600; 98 KB
 Clock spring-three tabs.jpg 600 × 626; 106 KB
 Clock spring-to neutral.jpg 800 × 600; 109 KB
 Closeup.jpg 800 × 600; 54 KB
 Clutch Slave Replacement1.jpg 750 × 500; 143 KB
 Clutch Slave Replacement13.jpg 500 × 473; 69 KB
 Clutch Slave Replacement14.jpg 750 × 500; 108 KB
 Clutch Slave Replacement2.jpg 750 × 500; 132 KB
 Clutch Slave Replacement3.jpg 750 × 500; 134 KB
 Clutch Slave Replacement4.jpg 750 × 500; 139 KB
 Clutch Slave Replacement5.jpg 750 × 500; 132 KB
 Clutch Slave Replacement6.jpg 700 × 467; 84 KB
 Clutch Slave Replacement7.jpg 750 × 500; 72 KB
 Clutch Slave Replacement9.jpg 600 × 400; 34 KB
 Compression Tester Gauge-Reading.jpg 240 × 271; 21 KB
 Concept-3000gt-meme.jpg 400 × 304; 40 KB
 Connector removed.jpg 900 × 600; 101 KB
 Console in dark.jpg 800 × 600; 75 KB
 CoolantSensor01.gif 772 × 595; 24 KB
 CoolantSensor02.gif 783 × 308; 26 KB
 CoolantSensor03.gif 762 × 243; 10 KB
 CoolantSensor04.gif 767 × 471; 21 KB
 CoolantSensor05.gif 770 × 485; 31 KB
 CoolantSensor06.gif 763 × 632; 23 KB
 CoolantSensor07.gif 769 × 406; 15 KB
 CoolantSensor08.gif 769 × 341; 16 KB
 Coupe NOS 800x533.png 800 × 533; 598 KB
 CoverPry.jpg 634 × 700; 78 KB
 Cover 2009.jpg 1,600 × 1,034; 1.56 MB
 Cover 2012.jpg 3,500 × 2,300; 4.97 MB
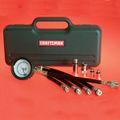 Craftsman compression tester.jpg 600 × 600; 42 KB
 CrossSection.jpg 761 × 670; 129 KB
 Cruise.jpg 500 × 350; 37 KB
 Cruise1.jpg 500 × 350; 44 KB
 Cruise2.jpg 500 × 350; 50 KB
 Cruise3.jpg 500 × 350; 51 KB
 Cruise4.jpg 500 × 350; 40 KB
 Cruise panel.jpg 500 × 350; 42 KB
 Cv-axle-passenger-side2s.jpg 216 × 44; 3 KB
 D2 1.jpg 400 × 290; 15 KB
 DCP 0738b.jpg 640 × 427; 76 KB
 DIAGRAMOFHARNESS.jpg 993 × 656; 32 KB
 DSC01040.jpg 640 × 480; 54 KB
 DSC01654.jpg 640 × 480; 91 KB
 DSC01846.jpg 640 × 480; 46 KB
 DSC02182.jpg 480 × 320; 60 KB
 DSC02449.jpg 640 × 480; 44 KB
 DSC02473.jpg 648 × 486; 27 KB
 DSC02475.jpg 607 × 400; 53 KB
 DSC02725.jpg 900 × 600; 167 KB
 DSC02727.jpg 900 × 600; 159 KB
 DSC02728.jpg 900 × 600; 163 KB
 DSC07731.jpg 640 × 427; 85 KB
 DSCF0576.jpg 900 × 600; 182 KB
 DSCF0840.jpg 800 × 533; 136 KB
 DSCF1751.jpg 533 × 800; 79 KB
 DSCF2204.jpg 800 × 600; 56 KB
 DSCF2808.jpg 800 × 600; 88 KB
 DSCF2846.jpg 800 × 533; 78 KB
 DSCF2851.jpg 701 × 467; 73 KB
 DSCF2858.jpg 800 × 533; 92 KB
 DSCF3028.jpg 800 × 533; 99 KB
 DSCF3961 9 stx lg.jpg 900 × 600; 52 KB
 DSCN0047.jpg 900 × 600; 140 KB
 DSCN0402.jpg 331 × 473; 88 KB
 DSCN1615.jpg 900 × 600; 177 KB
 DSCN1784.jpg 900 × 600; 74 KB
 DSCN7080Small.jpg 640 × 479; 88 KB
 DSC 0198.jpg 800 × 535; 33 KB
 DSC 0645.jpg 900 × 600; 140 KB
 DSC 0650.jpg 900 × 600; 148 KB
 DSC 0652.jpg 900 × 600; 161 KB
 DSC 0660.jpg 900 × 600; 88 KB
 DSC 0909.jpg 900 × 616; 79 KB
 Dallas3000gt tn.jpg 200 × 94; 6 KB
 Dash.gif 730 × 1,000; 42 KB
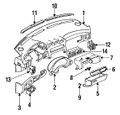 Dash.jpg 574 × 548; 86 KB
 Dasharea.jpg 900 × 600; 129 KB
 Daveslow tn.jpg 200 × 150; 13 KB
 Deathsledvr46-1.jpg 200 × 150; 16 KB
 Deathsledvr664.jpg 800 × 533; 117 KB
 Dec08 tn.jpg 200 × 133; 14 KB
 DecemberROTM ROTYtn.jpg 200 × 133; 24 KB
 DiagnosticPort1.jpg 330 × 222; 38 KB
 Diagram 91-93.jpg 1,434 × 737; 178 KB
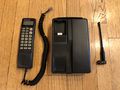
 DiamondTel Model 92.jpg 3,024 × 4,032; 3.44 MB
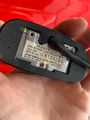
 DiamondTel Model 92 - AC-DC Power Supply.jpg 4,032 × 3,024; 2.51 MB
 DiamondTel Model 92 - Battery - Assembling New Cells.jpg 4,032 × 3,024; 2.83 MB
 DiamondTel Model 92 - Battery - Label.jpg 4,032 × 3,024; 3.04 MB
 DiamondTel Model 92 - Battery - New Cells Assembled.jpg 4,032 × 3,024; 2.52 MB
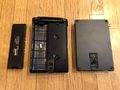
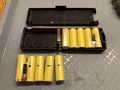 DiamondTel Model 92 - Battery - Split Open.jpg 4,032 × 3,024; 2.58 MB
 DiamondTel Model 92 - Generic Mobile Configuration Diagram.png 559 × 869; 215 KB
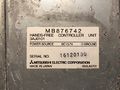 DiamondTel Model 92 - Hands-Free Controller Unit (back).jpg 4,032 × 3,024; 3.31 MB
 DiamondTel Model 92 - Hands Free Module.jpg 4,032 × 3,024; 3.78 MB
 DiamondTel Model 92 - Hands Free Module (back).jpg 720 × 960; 54 KB
 DiamondTel Model 92 - Handset (back).jpg 3,024 × 4,032; 2.45 MB
 DiamondTel Model 92 - Handset (front).jpg 3,024 × 4,032; 2.4 MB
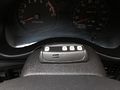
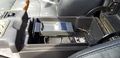 DiamondTel Model 92 - Handset Cradle in Center Console.jpg 2,048 × 995; 260 KB
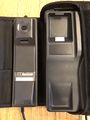
 DiamondTel Model 92 - Leather Carrying Case.jpg 4,032 × 3,024; 3.78 MB
 DiamondTel Model 92 - Portable Configuration Diagram.png 738 × 740; 169 KB
 DiamondTel Model 92 - Portable Configuration Parts.jpg 4,032 × 3,024; 2.44 MB
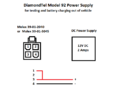 DiamondTel Model 92 - Power Supply Diagram.png 710 × 575; 16 KB
 DiamondTel Model 92 - Transceiver and Hands Free Controller Installed.jpg 4,032 × 3,024; 3.82 MB
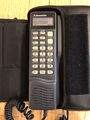
 DiamondTel Model 92 - Transportable Cover Removed.jpg 4,032 × 3,024; 658 KB
 DiamondTel Model 92 Brochure.pdf ; 3.4 MB
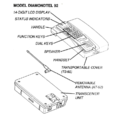
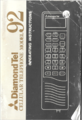 DiamondTel Model 92 Operating Instructions.png 566 × 831; 787 KB
 Do a.jpeg 719 × 479; 84 KB
 Dodge.zip ; 7 KB
 Dodge Stealth Hidden Rear Wiper Mod-2.jpg 640 × 480; 129 KB
 Dodge Stealth Hidden Rear Wiper Mod-3.jpg 640 × 480; 101 KB
 Dodge Stealth Hidden Rear Wiper Mod-4.jpg 600 × 480; 161 KB
 Dodge Stealth Hidden Rear Wiper Mod-5.jpg 611 × 489; 93 KB
 Dodge Stealth Hidden Rear Wiper Mod.jpg 640 × 480; 143 KB
 Downpipe-Lowered.jpg 576 × 432; 20 KB
 Downpipe-Removed with Front Precat.jpg 576 × 432; 33 KB
 Dragracing.jpg 604 × 403; 38 KB
 Drags.jpg 600 × 219; 30 KB
 Dragsme2.jpg 500 × 333; 29 KB
 Drgonzo3000 tn.jpg 200 × 133; 9 KB
 Driveshaft diagram.jpg 927 × 635; 70 KB
 Dual uego.jpg 609 × 523; 37 KB
 Dualmonitor.jpg 286 × 226; 11 KB
 Dyno.jpg 900 × 434; 88 KB
 ECSNewCapacitors.jpg 600 × 425; 106 KB
 ECSTabsOpen.jpg 750 × 509; 36 KB
 ECScapacitorsREMOVED.jpg 400 × 548; 90 KB
 ECScapsREMOVED2.jpg 650 × 500; 123 KB
 ECStabsCLOSED.jpg 700 × 467; 38 KB
 ECUCase2.jpg 800 × 533; 52 KB
 Eblack3.jpg 543 × 362; 58 KB
 Eblack4.jpg 900 × 600; 139 KB
 Eblack5.jpg 900 × 600; 131 KB
 Ebowden8.jpg 400 × 516; 67 KB
 Ecu-94 95 tt cali spec pinout.png 780 × 142; 171 KB
 Ecu-conn 91-93.gif 400 × 147; 23 KB
 Ecu-conn 94-95 Federal.gif 403 × 159; 13 KB
 Ecucapmarks.jpg 512 × 455; 79 KB


.jpg)


.jpg)

.jpg)
.jpg)
.jpg)


.jpg)

.jpg)
.jpg)


.jpg)
.jpg)


.jpg)

.jpg)
.jpg)
.jpg)


